 Hi there!
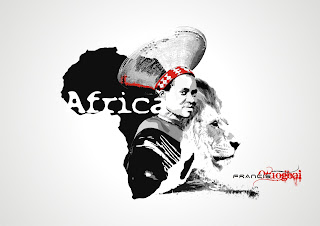
 This is a vector tutorial that was completely created in CorelDRAW X4, the steps are very easy and so quick.
The tutorial does not require you know how to use CorelDRAW, just follow the steps and you might just turn your entire photo album to vectors.
Have fun!
Have fun!
Follow this steps
To download the images I used click on the links below
Open your CorelDRAW X4, Click on New document
To place your images in the workspace
Click on File > ImportIt shows a pop-up, locate the Jpeg files you just saved and click on Import
Then Slam your Enter button
Place the selected image of the woman on the page by pressing the
P button or just drag it in
Note: for you to perform any task you must select your image by clicking on it
Now it’s time to bitmap it click on Bitmap > Convert to Bitmap
(Alt + B > Ok)
A pop-up will appear click on
Grayscale > Ok
(Tick the Transparent background option)
This is the result
After that Click on
Bitmaps > Auto Adjust
Click on Effects > Adjust > Brightness/Contrast/Intensity
(Ctrl + B)
A pop-up window displays
Enter the following numbers appropriately
Brightness – 50
Contrast – 50
Intensity – 50
And slam Ok
Here’s the result
 Click on Bitmaps > Auto Adjust
 Click on Effects > Adjust > Brightness/Contrast/Intensity (Ctrl + B)
A pop-up window will appear, enter the following numbers appropriately
Brightness – 10
Contrast – 10
Intensity – 10
And slam Ok
And then click on
Trace Bitmap > Outline Trace > Detailed Logo
Note: You must be using CorelDRAW X4 to use this feature in this step
click on Keep original size
And you have another pop-up window display
Enter the following numbers appropriately
Details – extend the bars to the end
Smoothing – 50
Corner smoothness – 0
And slam Ok
Here’s the result
To flip the picture,
select this icon
Change some part of the woman’s face to white by Ctrl + Click, to select it and click on white on the colour pallet by the extreme right.
Add some more colors to the head gear by Ctrl + Click select red on the colour pallet
Trim some of the woman’s edges off (If you are a newbie, download the tutorial click this link)
Apply this same technique in converting the woman to a vector to the other images (the lion, landmark and the Africa silhouette)
Drag the Africa silhouette vector close to the woman and place it under the vector woman by pressing
Ctrl + pg dn till it goes beneath it
Drag the lion and the land closer then delete some part off by clicking Ctrl + Click then Del
All you need to do here is display some creativity
This should be your result
Now to add our text
Press F8, click on the page then type Africa
You can download the font I used here http://www.dafont.com/xfiles1.font
Drag it closer and place over all objects by pressing Shift + pg up
And we are done
Here are some other works that were done with this technique
I greatly hope you enjoyed this tutorial.
Kindly leave a comment, cheers.
By Francis Otuogbai


NIce work, please how did you place the woman to fit to the african silhouette edge and also make stand out at the top of the african silhouette?
ReplyDeleteThis is really a nice and informative, containing all information and also has a great impact on the new technology. Thanks for sharing it, vector tracing
ReplyDeleteThis comment has been removed by the author.
ReplyDelete